Let me say, we’ve all been there. Your boss hands you a stack of documents he wants scanned in to share with the rest of your team, but he wants them secure, so scan to email won’t do. Maybe you need to use those photos you took to create a presentation. You have the perfect machine to help you with the task too, because right there in the office is a nice Canon ImageRunner Advance, and scanning directly to your computer is faster and more secure.

It should be easy enough to do, right? Right!

Only, when you try, you find yourself standing there staring at the machine and asking, “Why aren’t you doing what I want you to???” It’s frustrating because you are a complete aficionado at the other functions of this machine, and this shouldn’t be this hard!

Making a Scan To Folder Step One: Breath!

First, I need you to take a deep breath, because help is on the way! I’m going to tell you exactly how to do this, and you’ll never struggle setting up a scan to file again!

Next, you need to set up a file on your computer as a destination for your scans, and remember where you put it. There’s nothing worse than creating something on your computer, then forgetting where it is! To do this, open Windows Explorer (which you can find under your start menu, or by typing it into Cortana) and click on the C: drive. Once there, you will create a new folder and label it whatever you want. Pick a name that you will remember, because this is where the scanned documents will go! Before you move on, create a shortcut for the file by right-clicking on the folder and selecting Create Shortcut from the menu.
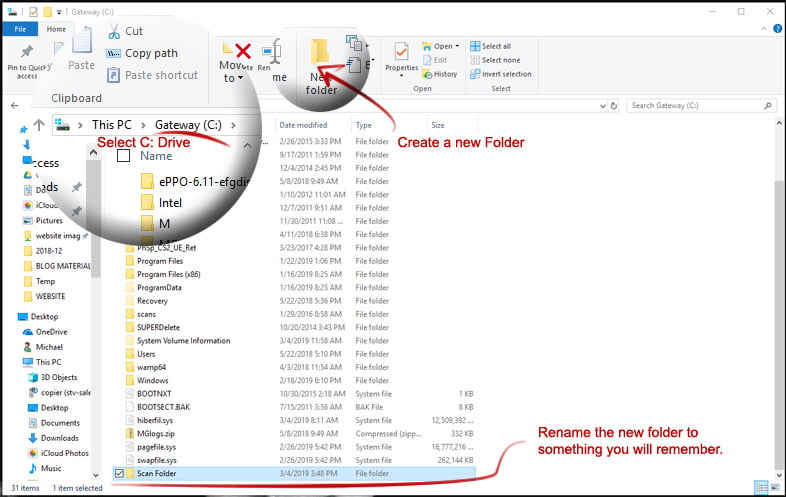
Creating a new folder in the C: Drive


Right click on the new folder and select Create Shortcut, put that on the desktop.

Making a Scan To Folder Step Two: Sharing is Caring

Now you’re going to change the share settings of this folder. The computer won’t know to share it with others in your network unless you tell it to, so you can’t skip the next few step. I know this is a bit tedious, but bear with me. Right-click over your new scan folder, and choose the “properties” option.

A box should pop up entitled “Folder Properties.” From here, you will select the sharing tab then click the “share” button, which will bring up “Network Access.” Go to the drop-down menu and choose “Everyone,” allowing access to those that you shared the new folder with. Don’t get too excited just yet! Before clicking “Share” at the bottom, you’ll want to change the permission level to “Read/Write”; otherwise coworkers will only be able to view the files, not interact with them.
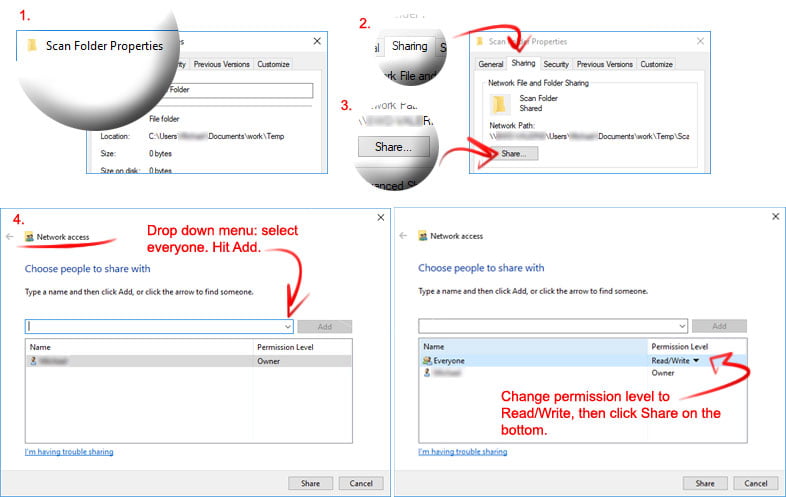
Sharing Scan-to folder to everyone.


Share the folder.

Now go ahead and click that share button!

We’re done, right? Not quite … Step 3

You should see a message that says, “Your folder is shared,” which is great—that’s what you want to see! Make sure you see the scan folder you created, as well as the computer name. This is super important—you’ll thank me later. Highlight and copy your computer name, and if you’re like me, also write it down on a post-it for good measure (You can find this on the Scan Folder Properties box under the Sharing tab. It is the first name in the Network Path) .

Go ahead and close out of the Network Access box now, and the Folder Properties box as well. We’re done with that part. Whew!

You’re almost ready! We’re moving down the home stretch!

Next, ensure the computer and the copier are on the same page, so to speak. Open a web browser and enter your copier’s IP address in the address bar (you can find this in your copier settings, click here for instructions). If you need to log in, do that now; otherwise, the screen will automatically continue to the next step.

On the left side of the screen select the “Address Book,” then select an Address List (The first list is fine as each list will hold thousands of records).
Once you’ve picked your list, select “Register New Destination.”

Select Register New Destination


After you select your Address List

Step 4: The Home Stretch

Starting under the “Type” field, choose “File” on the little drop-down menu and then hit “set.” Next, plug in your information under the “File” header. The name will be whatever you want your document file to be labeled. Remember the computer name I had you copy? I hope so. Enter that computer name into the “Host Name” field. Type in the name of the folder you made in the Folder Path field. Finally, enter the username for your computer. Hint: This is the one you use to log in to your actual computer.
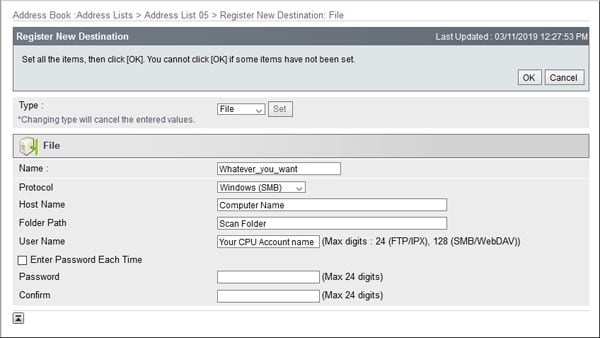
Whew!!! That’s it! Now your computer and copier are talking to each other, and you can go to your copier and scan those bad boys in like the pro that you are! Aren’t you proud of yourself?

Article by Jessica Scroggin

Aw, Come On! I Wanted A JPEG, Not A PDF!

It’s a busy day, with piles of work stacking up in front of you. With each addition to the load, you can almost feel the hair on your head turning gray.

To get started, you pick up a stack of images you need to scan to your editor before they can be placed in your newsletter. You take the images over to your new imageRUNNER ADVANCE and scan one in, making sure to select the file type .jpg in the process. So far, so good. Then, as you start to scan in the next one, you notice the settings have reverted back to .pdf. No problem, you think to yourself as you reselect .jpg.

However, when you begin to scan in the third image, it’s back to .pdf. “NNNOOOOOOOO!” you cry out in anguish. You grab the bat you conveniently keep next to the copier, and then proceed to go Office Space on the new imageRUNNER. Your fantasy is interrupted by a quickly developing headache playing a drum solo on your frontal lobe. You place your forehead in your hand and shake your head slowly, with a sigh.

Before you decide to use your copier as a piñata, follow these simple instructions to make your preferred settings the default on your new imageRUNNER ADVANCE.


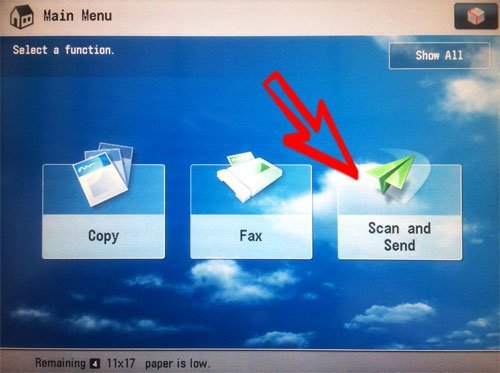
On the Main Menu, select Scan and Send.

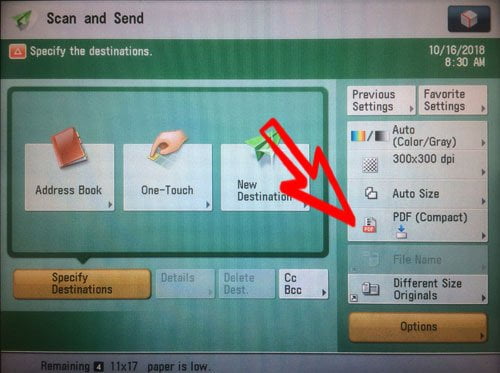
On the next screen, select the File Format box.

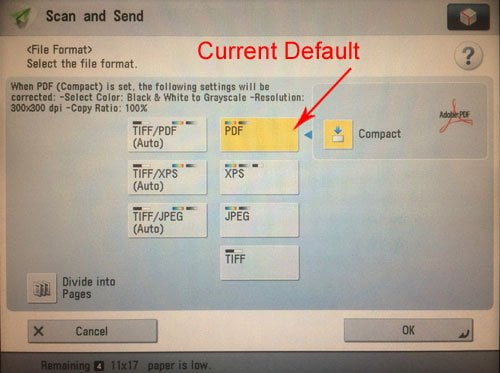
The File Format screen will have the default file format pre-selected.

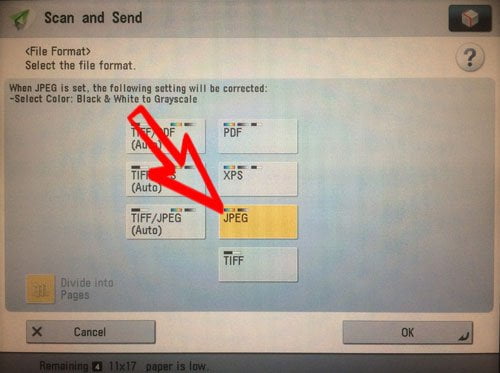
Select your preferred file format and then press OK.

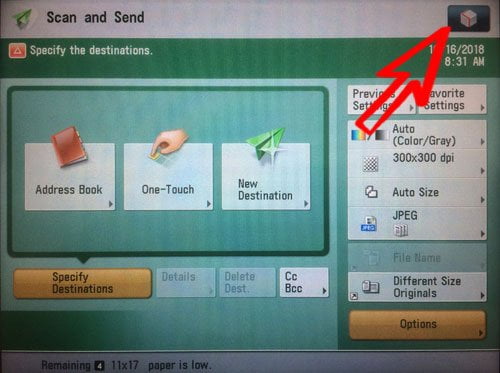
On the next screen, press the image of the cube in the top right corner.

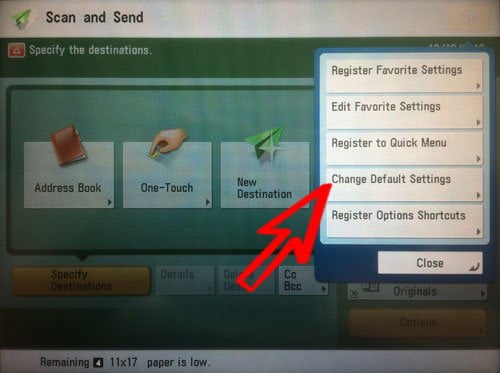
On the following menu, select Change Default Settings.

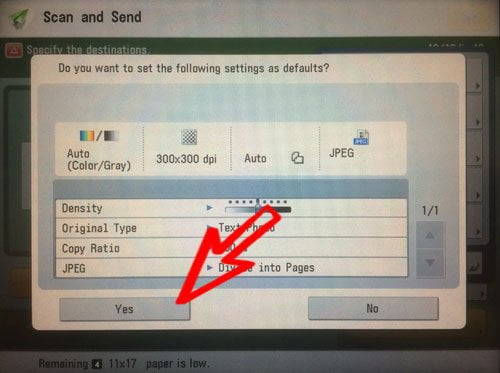
This last screen will display the settings you just changed. Simply press Yes to continue.

That’s it! Finito! All done! If you still wish to Hulk out on a piece of office equipment, at least you won’t have to take it out on your imageRUNNER ADVANCE.

Why The Canon imageRUNNER Is An Absolute Game Changer
When you’re shopping for the copier that’s right for you or your business, it basically comes down to personal preferences. Though, there are definitely some points you’ll want to focus in on.

COST

First and foremost, there is the cost to consider. Finding a copier that meets all of your needs is important, but the main constraint most people are working within is financial. The Canon imageRUNNER Advance C250iF is an exceptionally affordable multi-function device for the range of diverse functions it offers the user. And remember that the sun doesn’t necessarily rise and set on the price tag. The value your multi-function device offers is heavily weighted on efficiency.  

EFFICIENCY

The price tag of a low efficiency device might be appealing and you may wonder “How much money would a low efficiency device honestly waste?” As a bit of a thought experiment consider a scenario in which each employee wastes an average of 5 minutes a day on a low efficiency printer or scanner. Multiply that by 5 days a week. And finally expand this sum out to the 52 weeks in a year and you get something like 21 wasted hours per employee, per year. Extrapolate that value out to the number of employees in your business and you have a very substantial amount of wasted time and wasted money. 

The Canon imageRUNNER resolves this issue. It is a high speed multi-function device that not only has a high rate of printing and a user-friendly interface, it can also connect to hand held devices to offer even more ease of use.

AESTHETIC

The care and attention to quality that you hold your business to is partly reflected in the business tools you are using. Looks certainly aren’t everything, but for clients and employees alike, it is definitely a point of reassurance. Taking pride in the appearance of your business tools boosts morale and assurance in the type of quality you are dedicated to providing. The Canon imageRUNNER Advance C250iF offers a sleek streamlined design that you will be very proud of.Remember that these are only a few things to consider when choosing the copier that’s right for you. Again, it certainly comes down to personal preference With the wide range of available choices, it can be difficult to make the right decision. It can also be very helpful to visit a trained professional who can help you find the right device for your business. Since 1972, Kirbo’s Office Systems has been doing just that. Call us today!

It’s official, we have a blog and know how to use it.

We have finally decided to take the plunge and add a blog to our site. We always wanted an easy way to share information with visitors and we’re super excited to start this journey. Keep coming back to our site and check for updates right here on the blog.